Preface
This guide will help you get started installing ThinLinc after downloading the ThinLinc Server Bundle.
The installation of ThinLinc Server is a guided installation and setup wizard that walks you through the installation and initial configuration. A typical ThinLinc installation will not require more than 10-15 minutes of your time.
For more detailed instructions, refer to the Administrator’s Guide.
Software requirements
As long as your platform fulfills the requirements listed in 3.2. Requirements in the Administrator’s Guide, ThinLinc should work as expected.
The server installer will try to resolve the required dependencies automatically and will prompt you for handling these.
Desktop environment
Make sure you have installed a desktop environment, such as Xfce, LXDE, MATE or other. Please refer to your distribution documentation for how to install these.
For best performance we recommend to install a more lightweight desktop environment without compositing.
Unpacking the ZIP file
After you have obtained and downloaded ThinLinc, unpack the ZIP file by right-clicking and select “Extract…”. You can also unpack it from a command prompt:
$ unzip tl-4.14.0-server.zip
Installing ThinLinc Server
Before starting the installation program, review our Platform Specific Notes to see if there is anything specific to your Linux distribution that you might need to be aware of.
The installation has two parts; the first, ‘install-server’ will install the ThinLinc packages appropriate for your platform – RPM or DPKG.
When this task has completed, ThinLinc will be configured. This is done with the ‘tl-setup’ command and install-server will ask about starting ThinLinc Setup automatically at the end of the package installation.
You can invoke the graphical installation of ThinLinc by double clicking on “install-server”. You can also start the installation from a command prompt:
$ cd tl-4.14.0-server

$ ./install-server
Follow the simple installation instructions and you will soon have installed and configured ThinLinc server on your machine. If you encounter any errors or have questions regarding this part of ThinLinc, we encourage you to join our ThinLinc community where you can ask questions and interact with other ThinLinc administrators & users.
Verifying the installation
After the installation has finished you can verifiy that the ThinLinc server services has been started correctly with the ‘systemctl’ command
$ sudo systemctl status vsmserver

$ sudo systemctl status vsmagent

$ sudo systemctl status tlwebaccess
All services should be reporting ‘ Active: active (running)’. If some or all services has failed to start, you should investigate your systems journal with journalctl and/or investigate the ThinLinc server logfiles which can provide information to why they failed to start.
/var/log/vsmserver.log

/var/log/vsmagent.log

/var/log/tlwebaccess.log
Need help?
We hope that most of the questions that might occur during installation are answered in the Administrator’s Guide. Use the search box at the right top of Cendio’s webpages to search for keywords.
If you can’t find the answers to your questions, don’t hesitate to join and ask questions on the thinlinc mailing lists or the ThinLinc community. You can also contact our demo support.
For more troubleshooting tips, please see Appendix B. Troubleshooting ThinLinc
Getting started with the client
When the installation program has ended, your server should be running a ThinLinc Server, and you should be able to connect to it using a ThinLinc client. We provide clients for all major operating systems (GNU/Linux, macOS and Windows). You find clients suitable for your machines on our client download page.
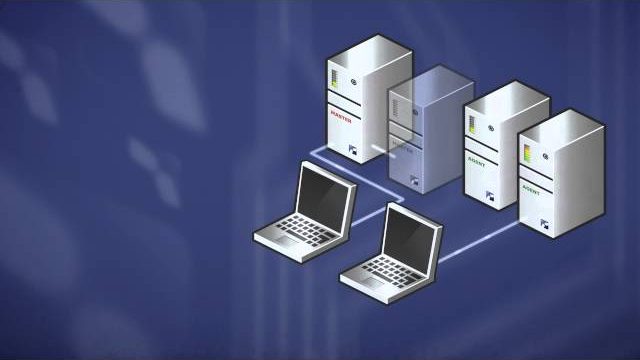
The client devices access the ThinLinc server and get their Remote Linux Desktop using two methods:
The ThinLinc native client – The ThinLinc native clients require the client device to have access to port 22 (SSH) on the server and are compatible with GNU/Linux, macOS and Windows.
Or:
The Web Access is an HTML5 based web client compatible with all major browsers and is accessible on “https://your.ip:300”, requiring in this case access to port 300 (web access) on the ThinLinc server.
See Appendix A. TCP Ports Used by ThinLinc. for more information
Prepare Network when behind NAT (Optional)
If your server is behind a residential or corporate firewall, you need to adjust some parameters to use ThinLinc. For more information, please see 3.3.4. ThinLinc in a NAT/Split-DNS Environment.
Understand how ThinLinc works